
3D rendering using Microsoft Azure

Imagine - you’ve created a 3d model of your object (interior, mechanism, construction plant etc.) using 3DMax for example. Of course, it can be Blender or Maya or many other tools. After creating a model, you want to get a photorealistic image of it. This process of applying all textures, materials, light sources and camera position is called rendering. Depends on complexity of the model, desired quality and size of the outcome picture, it can take hours and days to render just one picture on a creator’s work server.
Model and image can seem like this:

In my example, rendering of 1 frame takes 30 min. Now you need to create a short 5 minute movie. With 25 fps, you have to render 25x60x5 = 7500 frames. It will take you 7500x30 = 156 days.
Not an option to do it on your own, right? And even you can double your equipment - 2.5 month still far from acceptable.
Of course, modern market is full of rendering service providers who can help you.
This post is how to build you own render farm and why this is a good idea.
Why
With Azure, you can engage thousands CPU cores with per-minute billing, automate rendering and control process by your own.
You can easily submit a few frames to estimate total cost and time. You even can use your own software and licenses, or rent it on a per-core per-minute rate (for 3DMax and V-Ray for example).
In addition, it can be 40-70% cheaper and 2-7 times faster than market average, according to my real cases.
So, why you have to pay to 3rd party provider doing this job? Let’s rock!
How
I will split this part into two - how to set up Azure part (probably you will need it once for all your rendering project) and Application part (you will use it every rendering project) After this part I will explain how much it will cost you.
Azure part
First of all, you need an Azure subscription. You can get free trial with $200 here. In order to rent 3rd party licenses (like Autodesk or Chaos V-Ray), you can use your card, because you cannot pay for it with Microsoft credit. And of course you can use your existing Azure subscription, many companies already have it - just ask your IT about it.
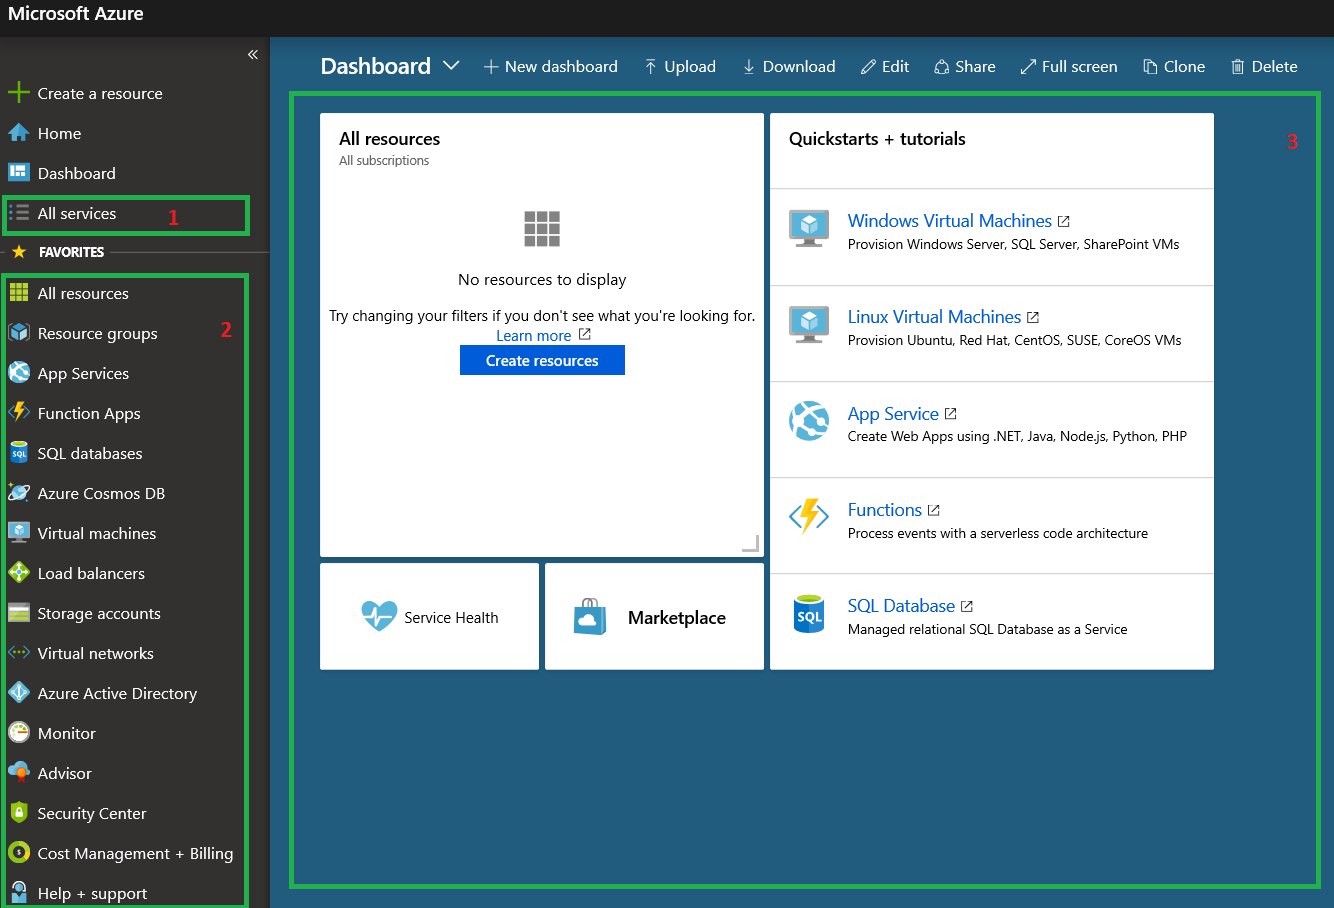
So, you got access to Azure subscription. Now you need to login to Azure portal. Here you can see your home screen or dashboard. On the left you can find you favourite service groups (2) and you can customize it with All services (1).
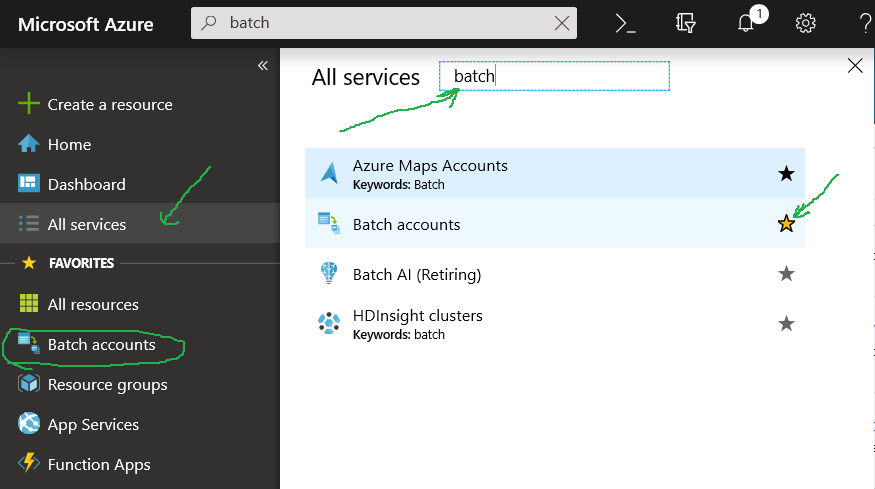
Let’s get Batch service to front and create Batch account
Here we should create:
- Resource group. This is a logical collection of assets for easy monitoring, access control, and for more effective management of their costs. Name it, for example, Rendering
- Storage account. Select Account kind as StorageV2. We will use it for storing our scene file/textures, as well as results.
- Location. You can choose any region. But according to Azure Price Calculator, our desired VM Low Priority F32s V2 will cost less in EastUS datacenter
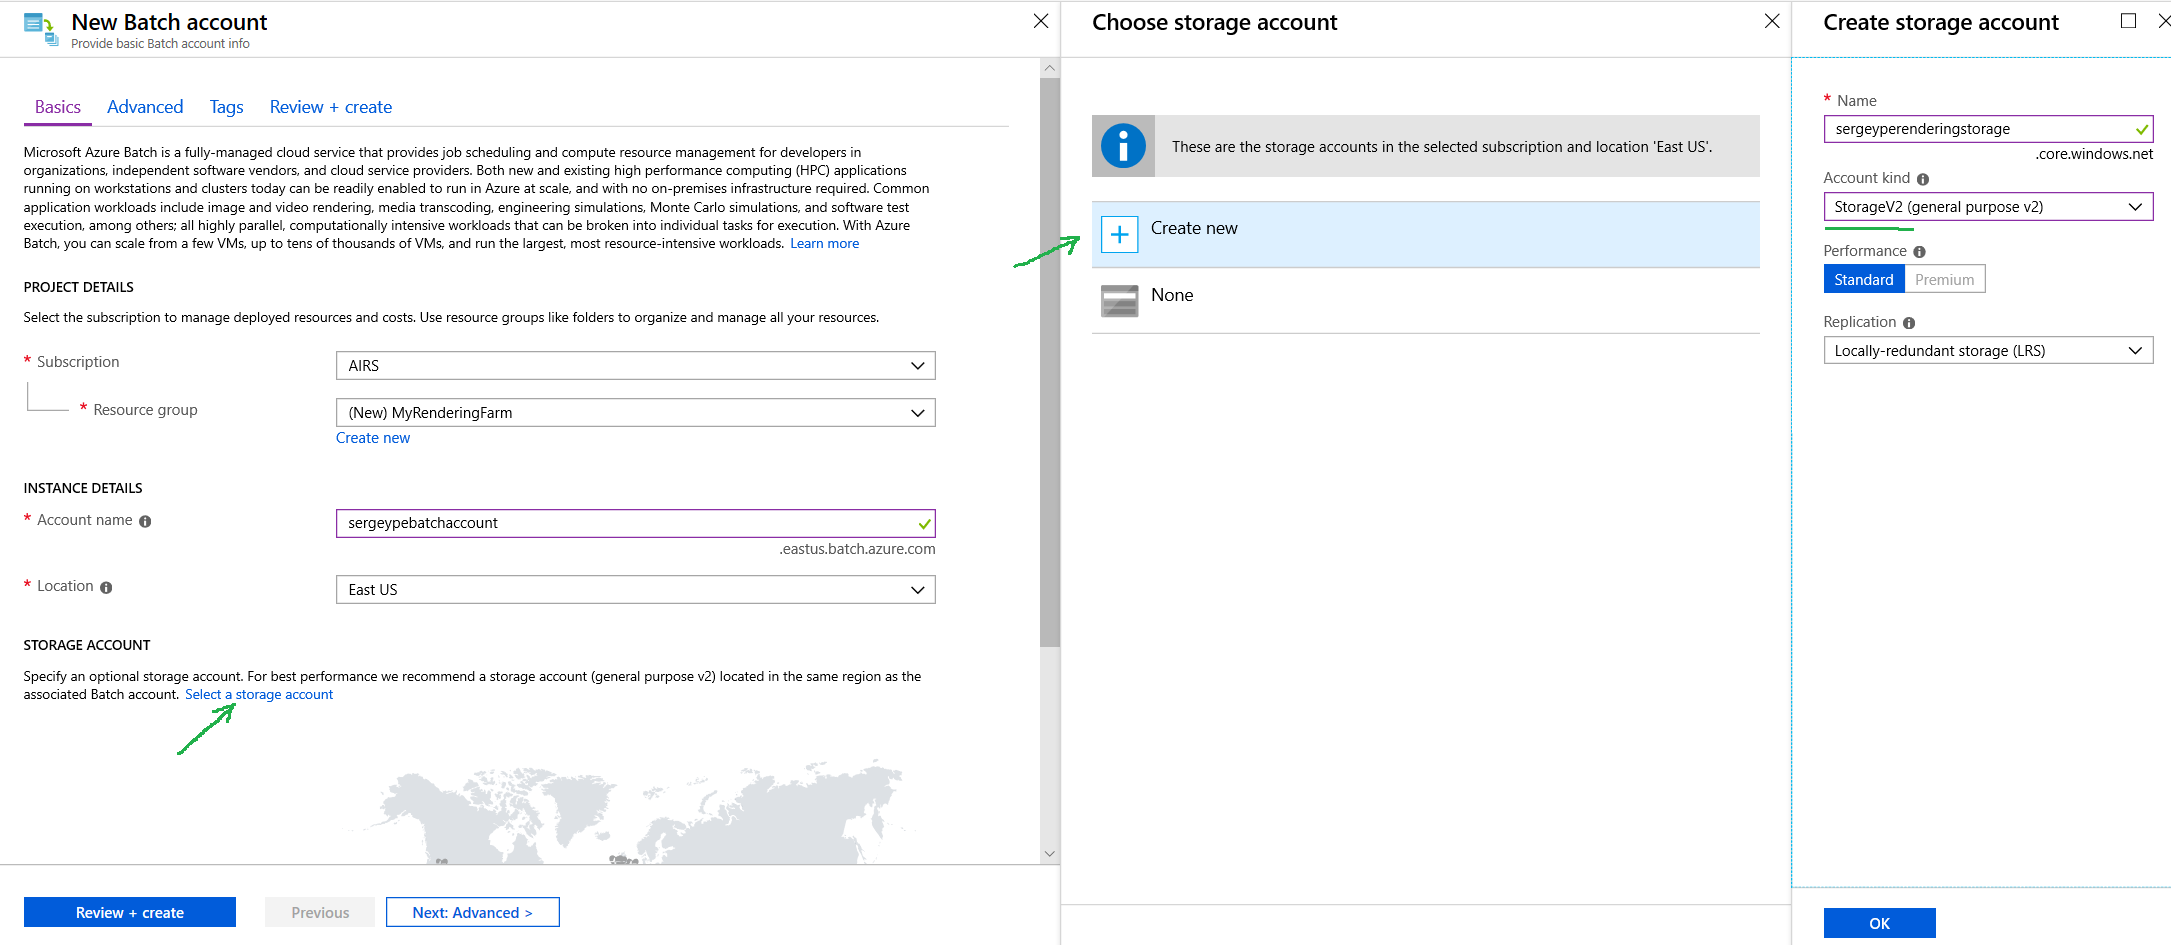
Leave other parameters by default and click Create.
One thing I want to note here - you can use for this purpose two VM types:
Dedicated. This VMs will be available to you 100% time you need it.
Low Priority. This VMs are not guaranteed. It is a surplus power, based on plans and demand, they can disappear/reappear at any time. But this VMs will cost you 2.5 times cheaper than Dedicated. When you need huge amount of parallel compute resources, it is a perfect choice.
I will use Low Priority to keep costs low.
Now its time to create support request. No, we did not break something already :). Issue is that by default everyone have a limit for available resources to prevent the use of huge resources unknowingly. But we know what we are doing, right? Our ambitions are far above 100 default cores.
Navigate to Help + support on the left. Click New support request and fill it:
- Issue type - Service and subscription limits (quotas)
- Subscription - Select your subscription
- Quota type - Select Batch.
Click Next.
Click Provide Details and select location of your Batch account, Low-priority cores as Resources, as well as set New Limit to 1600 cores. You can ask for more if you want, up to hundreds of thousands. Click Save and continue below
Choose Preferred contact method and click Next: Review + create »

In a few hours you can receive an email asked to provide Batch Account Name and VM Type. Reply with your Batch account name and VM type FSv2 as per this example.
Application part
Now it’s time to render our first project. You can do it using simple native Batch Explorer application. In this case you do not have to have 3ds Max installed, so you can render complex project even using tiny PC. Or you can install plugin for 3ds Max application and submit you project in a native way. I will show the first option.
After installing and running the Batch Explorer, you need to login to your Azure account and select your Batch account.
First, create Compute Pool:
Navigate to Pools on the left, our pool list is empty. You can use Autopool for each rendering, but I prefer to have my own, with all plugins I need. Click ”+” above and let’s create out first pool.
1) ID and Display name is basically a name of your pool
2) Scale is a principle of pool scaling. In case of Manual mode you have to put number of VMs before rendering and scale it to zero after the process.
Very important - you have to scale down to zero VMs in pool after job, otherwise you will be billed for all running VMs in pool even job is finished!
To avoid extra charges we will use autoscale function. It will scale up VMs based on tasks amount. Here is my formula:
	startingNumberOfVMs = 0;
	maxNumberofVMs = 50;
	pendingTaskSamplePercent = $PendingTasks.GetSamplePercent(60 * TimeInterval_Second);
	pendingTaskSamples = pendingTaskSamplePercent < 70 ? startingNumberOfVMs : avg($PendingTasks.GetSample(60 * TimeInterval_Second));
	$TargetLowPriorityNodes=min(maxNumberofVMs, pendingTaskSamples);
	//$TargetDedicatedNodes=min(maxNumberofVMs, pendingTaskSamples);
In this formula you should change maxNumberofVMs parameter to desired number of VM. I will describe how to understand optimal number of VM later. More about Batch pool automatic scaling you can found here.
3) Next, you have to select OS Image. I choose Rendering WIndows2016 from Graphics and rendering group for my 3ds Max project.
4) I decided to rent 3rd party application licenses. So, I checked 3ds Max and V-Ray, and do not forget to read EULA and tick a box.
5) At this step you have to choose VM size. It could be NC series for GPU rendering or any other series for CPU rendering.
The most cost-effective, from my experience, is F32s_v2 for CPU.
Now, click Save and close.
Our pool is ready for rendering. But in my case, some 3ds Max plug-ins were missing (Multiscatter and CityTraffic). So, let’s add them. Also, here I will show how to install automatically GPU and CUDA drivers on NC series VM
Additional plugins
Both my plugins do not require additional license for rendering node. So all I need is to copy relevant dlo’s to the Plugin folder. First, make a zip archive with both files. I will name it 3dsmaxplugins.zip. Next, I will create a package in Batch Explorer with same name and version 1 with this zip attached.
Now we need to add this application package to our Pool, as well as install it among with GPU drivers.
Navigate to out Pool -> Configuration and do the following:
1) In Start task settings add this:
cmd /c "copy %AZ_BATCH_APP_PACKAGE_3dsmaxplugins#1%\\*.* %3DSMAX_2018%\\Plugins\ && install-azure-nc-drivers.cmd Standard_NC6"
Second part “&& install-azure-nc-drivers.cmd Standard_NC6” you should add only when you choose NC series VM for GPU rendering. In case you need CPU rendering with other VM series, omit it. More information about start task you can find here
2) For GPU rendering you should add Resource files to download GPU and CUDA drivers:
	Blob source - https://raw.githubusercontent.com/Azure/BatchExplorer-data/master/ncj/3dsmax/scripts/install-azure-nc-drivers.cmd
	File path - install-azure-nc-drivers.cmd
At the end, do not forget to set User identity to Pool user (Admin). Otherwise, you will get an error about admin privileges needed to install driver.
Our pool is ready. I want to bring your attention to the fact you do not have to pay for Azure at this point. Pool is ready, but VMs are not running, resources are not in use.
Now, let’s render our first project using this pool.
In Batch explorer navigate to Gallery. Here you can find ready-to-use templates. Pick 3ds Max and choose first Action - VRay or Arnold scene. Other Action are for Distributed rendering - when you need to render single huge and complex frame on many servers.
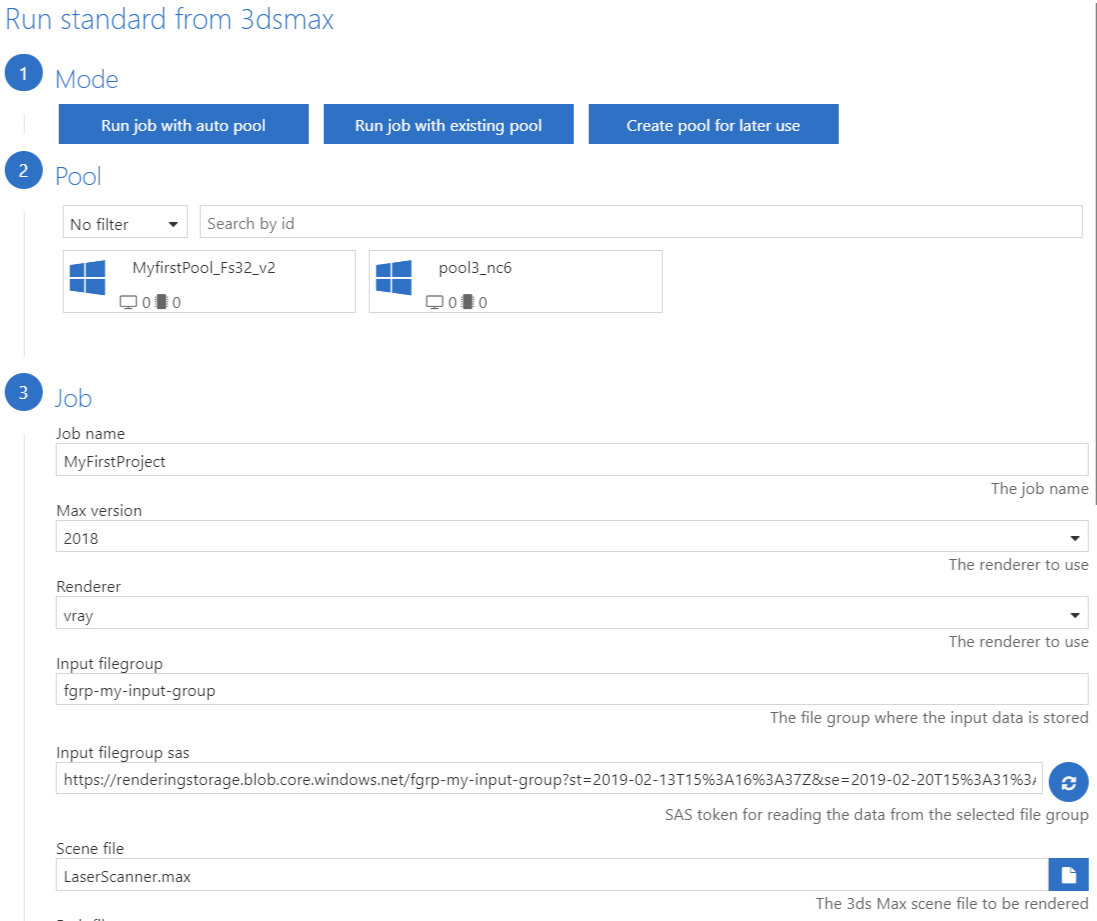
Next, choose Run job with existing pool and fill required and optional fields:
- Select newly created pool
- Name this job, select 3ds Max version and Renderer
- Input filegroup - Create new filegroup for storing our scene. Here you can create empty group or immediately add the necessary folders and files. It will upload it to Azure and your billing for storage will start (in next part you can find how much)
- Click Input filegroup sas and it will populate automatically
- Pick Scene file uploaded on previous step
- Frame start and Frame end is a range of frames or just single frame. If you need to render tens to hundreds to thousands frames, I sugest to estimate the optimal number of machines and time of rendering the entire project.
Every VM spend about 2-4 minutes (depends on series and size) on warmup and installing drivers, so time of first rendering on each VM takes 2-4 minutes longer than others. My proposition is to start with rendering only 2 frames, measure time difference between first and second frame and note time of second rendered frame. This information will help you to realize the optimal quantity of compute nodes needed to render whole project. - Outputs - like an Input filegroup, but used for storing results and logs
Click Run and close will start our project. In a few minutes our pool will start scaling to the number of frames, up to the number we mentioned in autoscale function
In a few minutes you can see the heatmap with all active VMs in your pool.
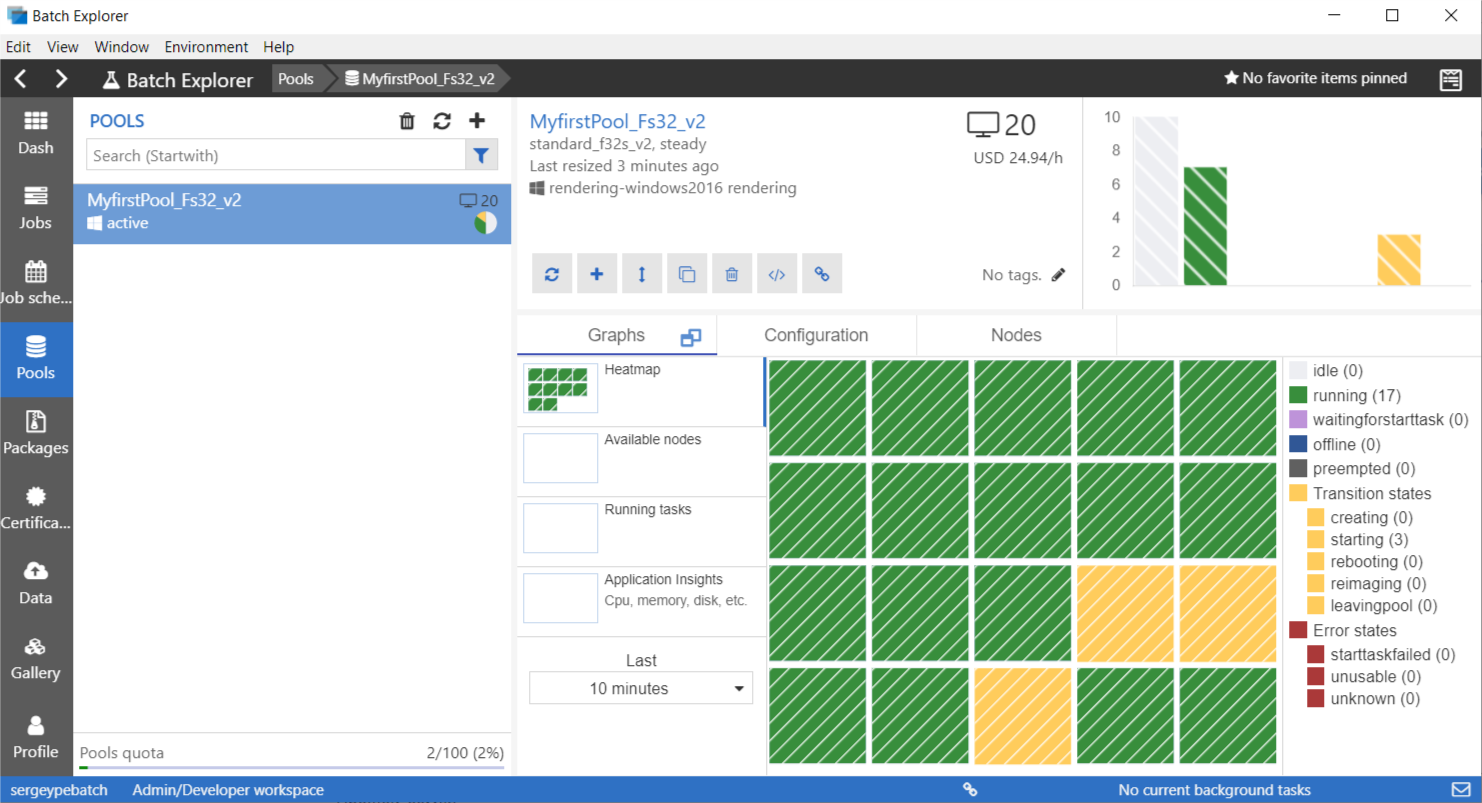
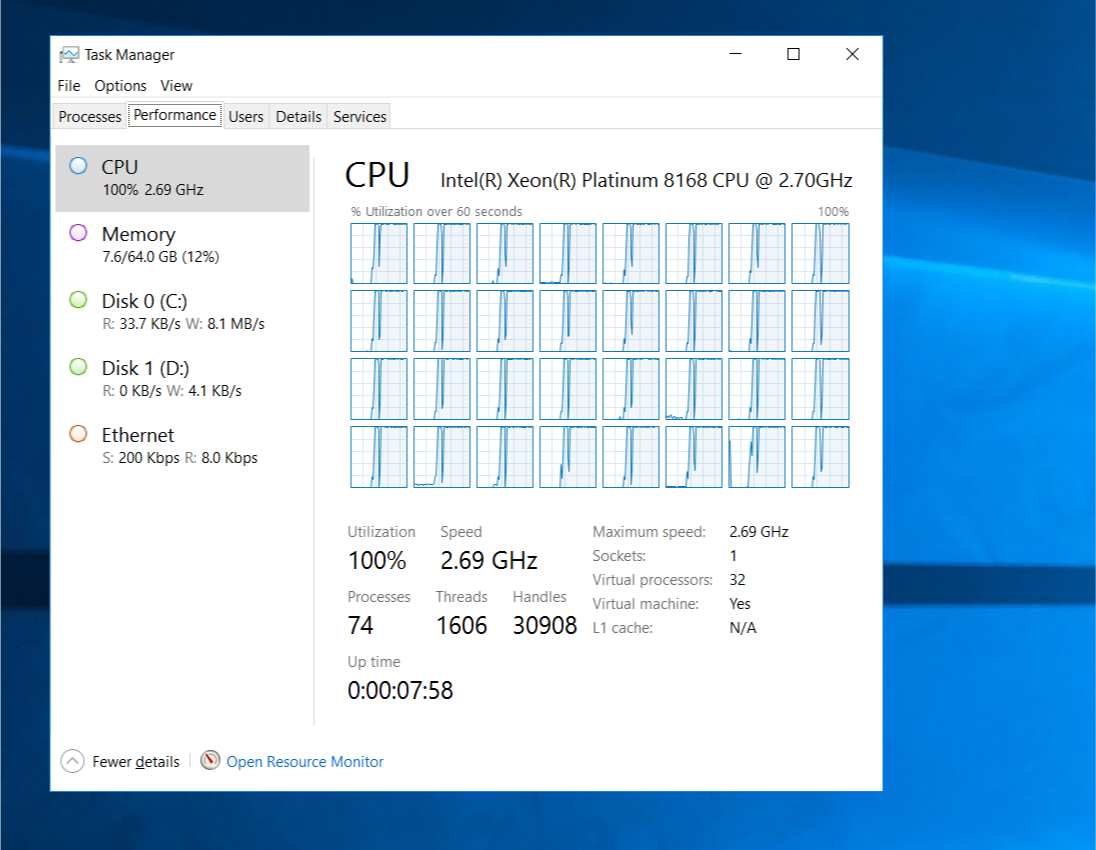
Moreover, you can make a remote connection to any VM and figure out what is going on
You also can check Jobs menu. Here you can see all your projects with all tasks (frames) statistics. And in Data section you can download results from Output folder once jobs done.
How much it will cost
Estimates for all and every Azure service are given on Azure Calculator. Actual prices may vary depending upon the date of purchase, currency of payment, and type of agreement you enter with Microsoft. You should contact a Microsoft sales representative for additional information on pricing. I will use it for cost estimation. Almost every Azure resource billed by minute, and VM is not an exclusion.
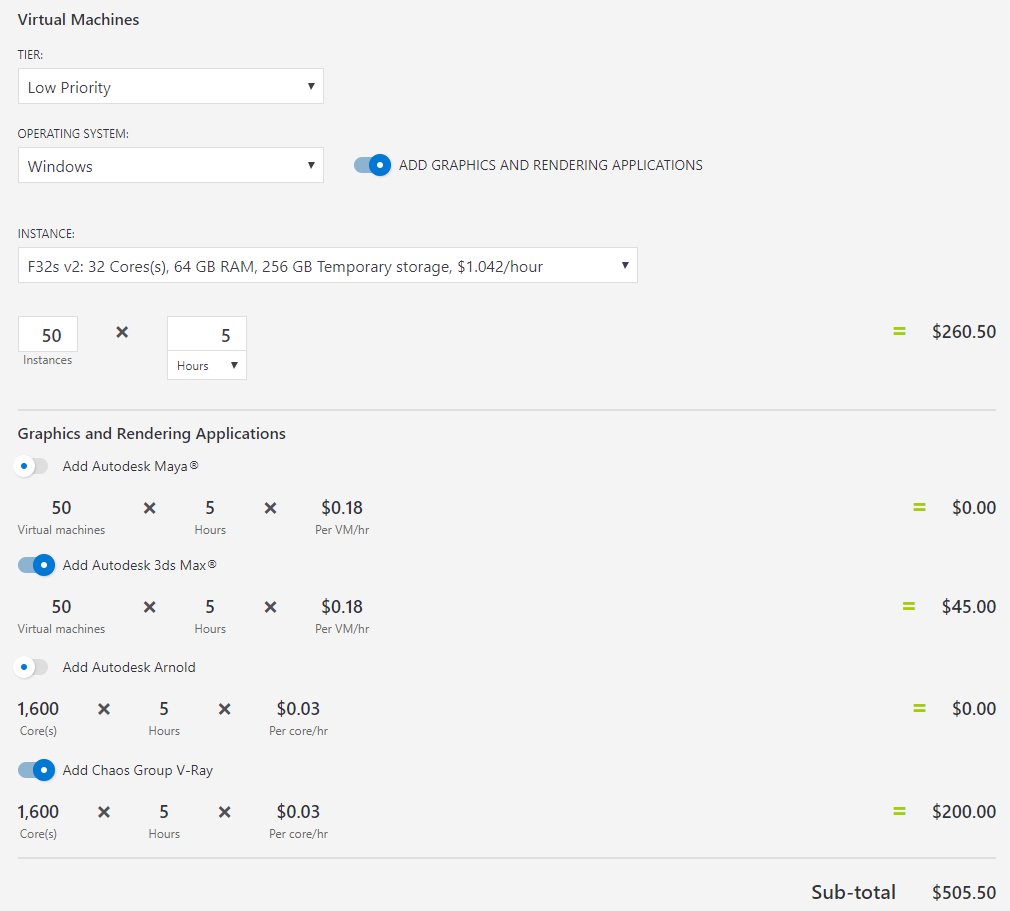
Suppose, to render all frames of our scene, it will take 5 hours of operation of 50 virtual machines with 32 cores each, for a total of 1600 CPU cores.
In addition, we will rent 3rd party licenses (Autodesk® 3ds Max and Chaos Group V-Ray). Of course, you can use your own licenses and build your custom image with it among with all desired plugins. But I will use simple scenario in this post - with license rent.
According to this information, the cost of compute resources can be about $505:
- $260.5 for 5 hours of working 50 x 32 vCPU VMs with WIndows Server license;
- $45 for 3ds Max licenses for this VMs;
- $200 for V-Ray licenses for this VMs;
You can find this prices at mentioned Azure Calculator, try search “Batch”
In addition to compute resources, you will consume Storage and Bandwidth. Let’s estimate it too:
- Storage - our project (1GB) and rendered frames (20GB) will consume $0.43 per month. We need only 2 days, so it’s about $0.03
- Bandwidth - you have to upload your project. Uploading to Azure is completely free. Downloading will cost you about $1.31
Do not hesitate to ask questions in comments if any!